Desktop Application & Vue Frontend Updates: GSoC 2025 Final Report

Hey Everyone 😊,
Welcome to my final blog for Google Summer of Code 2025 for the project Desktop Application & Vue Frontend Updates. At the begining of each heading you can see Deliverable, which gives information for users to know about the feature with no dev-terms(or very less at best 😉). For the dev side, read on!
What is the Project about 🖥✨
Desktop Application & Vue Frontend Updates: The project works on the Vue Simulator and aims at completing the vue-simulator. We have achieved several milestones like Authentication model, a beautiful Release Pipeline for Tauri simulator, version sync for v0 and v1, a brand new Testbench UI and best of all pushed vue-simulator to production. Let’s dive into them right away !!
Major statures that have been added and merged include:
- 🚀 Pushing the Vue-Simulator to production
- 🔐 Authentication model for Tauri Simulator
- 📝 Conventional-commits workflow
- ⚡ Release Pipeline for Tauri Simulator
- 🎨 An improved Testbench UI/UX
- 🔄 Legacy feature sync to v0 and v1
1. Pushing Vue-Simulator to Production
Deliverable: We have finally pushed the vue-simulator to production 🎉. We faced a lot of tricky problems along the way but finally after 4 GSoC projects we are here with vue-simulator in Production. The users can use legacy simulator by just clicking on the simulator at the homepage (URL - https://circuitverse.org/simulator). For using vue simulator they need to change the URL to https://circuitverse.org/simulatorvur which is equivalent to https://circuitverse.org/simulatorvue?simver=v0. This sets the v0 (base) version for vue-simulator. Users can also change the URL to https://circuitverse.org/simulatorvue?simver=v1, this sets the version to v1. We will be using v1 to rollout the beta updates for new features 🧪, after thorough testing and positive user response 👍 we’ll move those updates to v0. Users can freely choose to work on either of the three versions: legacy, v0, v1. The working of the Embed view can be seen in the video attached below. 🎥
Let’s tape the tale 📖: Pushing the vue-simulator to production has been the biggest objective for this project. The vision of vue-simulator being giving users option to use the various versions at will gave rise to a lot of contingencies ⚡. Let’s start with the first major bug 🐛 we faced:
1A. The Embed-Vue failure ❌ #643
When a user saves a circuit it can be viewed in the Dashboard 📂. When going into the Embed view i.e. when we click on more under a circuit we are directed to another page where we see the Embed view. The issue was that the paths were only handled properly for the legacy simulator causing the whole vue-simulator being loaded in the Embed area instead of just a lighter version of the simulator like how it is meant to be for the embedded format. To fix this we had to really delve into the codebase 🛠️. Here on is the crux of the situation and how we tackled it.
Problem ❌
- The
simulatorVersionwas not stored as a separate column in the database 🗄️. - Many older projects did not have
simulatorVersiondefined at all, since they were created using the legacy simulator 🕰️. - Because of this, we could not reliably read the field directly without risking errors ⚠️ or breaking compatibility.
Solution ✅
Step 1: Extract the simulator version from project data 📊
We added logic in the Project model to safely read simulatorVersion from the JSON field.
- If the field exists, we use its value.
- If it does not exist (as in legacy projects), we default to
"legacy".
This gave us a consistent way to determine whether a project was created with the new Vue simulator or the old legacy one.
Step 2: Add a helper method to detect Vue simulator projects 🔍
In the model, we introduced a method that checks the simulator version and returns whether the project is a Vue simulator project or not.
- Vue simulators are identified by versions
v0andv1. - Legacy simulators fall back to the default
"legacy"tag.
Step 3: Decide the embed path in the controller ⚙️ In the Project controller, we used the helper method to set the correct embed path.
- If the project uses Vue simulator, we assign the Vue embed path.
- Otherwise, we assign the legacy embed path.
This kept the decision-making clean and consistent.
Step 4: Render the correct simulator in the view 🖼️
In the show page, instead of hardcoding the iframe path, we used the path determined by the controller.
This ensures that the correct simulator (legacy or Vue) is embedded based on the project’s version.
Why this approach works 💡
- ✅ It supports both old and new projects without breaking anything.
- ✅ It avoids errors when
simulatorVersionis missing. - ✅ It centralizes the version-handling logic inside the model, keeping the controller and view simple.
- ✅ It makes the application future-proof 🔮.
Here is the working of Embed 🎥
1B. The Docker Failure 🐳❌
For Pushing the vue-simulator we needed to change the old hash pointing to the vue-submodule in the primary codebase to the new hash pointing to the current vue-submodule. This step in theory was supposed to be just 2 steps:
- Step 1:
cdinto thecv-frontend-vuesubmodule from themasterand usegit branchto switch to main - Step 2: Raise the PR for it.
But the technicalities of the process overshadowed us and we ran straight into a wall. The Docker publish image workflow was failing! 🚨 It had to pass, else we couldn’t merge the PR (PR #6012). Now we had to review and fix it as soon as possible. This turned out to be trickier than we thought. It earlier seemed like just an issue due to missing v0 in the outdir. We tried fixing it that way but failed. Finally, after a lot more debugging, this is how we solved it.
Problem Statement: Docker build failed with “not found” error when copying Vue simulator files from /public/simulatorvue/.
Root Cause: Vite config used relative path ../public/simulatorvue/ with undefined DESKTOP_MODE, causing unpredictable build output location.
Solution: (PR #6061)
- Created explicit output directory
/output/simulatorvue/ - Set
DESKTOP_MODE=falsefor consistent Vite behavior - Added fallback copy logic to handle different output paths
# In simulator_vue_build stage:
RUN mkdir -p /output/simulatorvue
ENV DESKTOP_MODE=false
RUN npm run build
RUN cp -r public/simulatorvue/* /output/simulatorvue/ || cp -r ../public/simulatorvue/* /output/simulatorvue/

# In final stage:
COPY --from=simulator_vue_build /output/simulatorvue/ /usr/src/app/public/simulatorvue
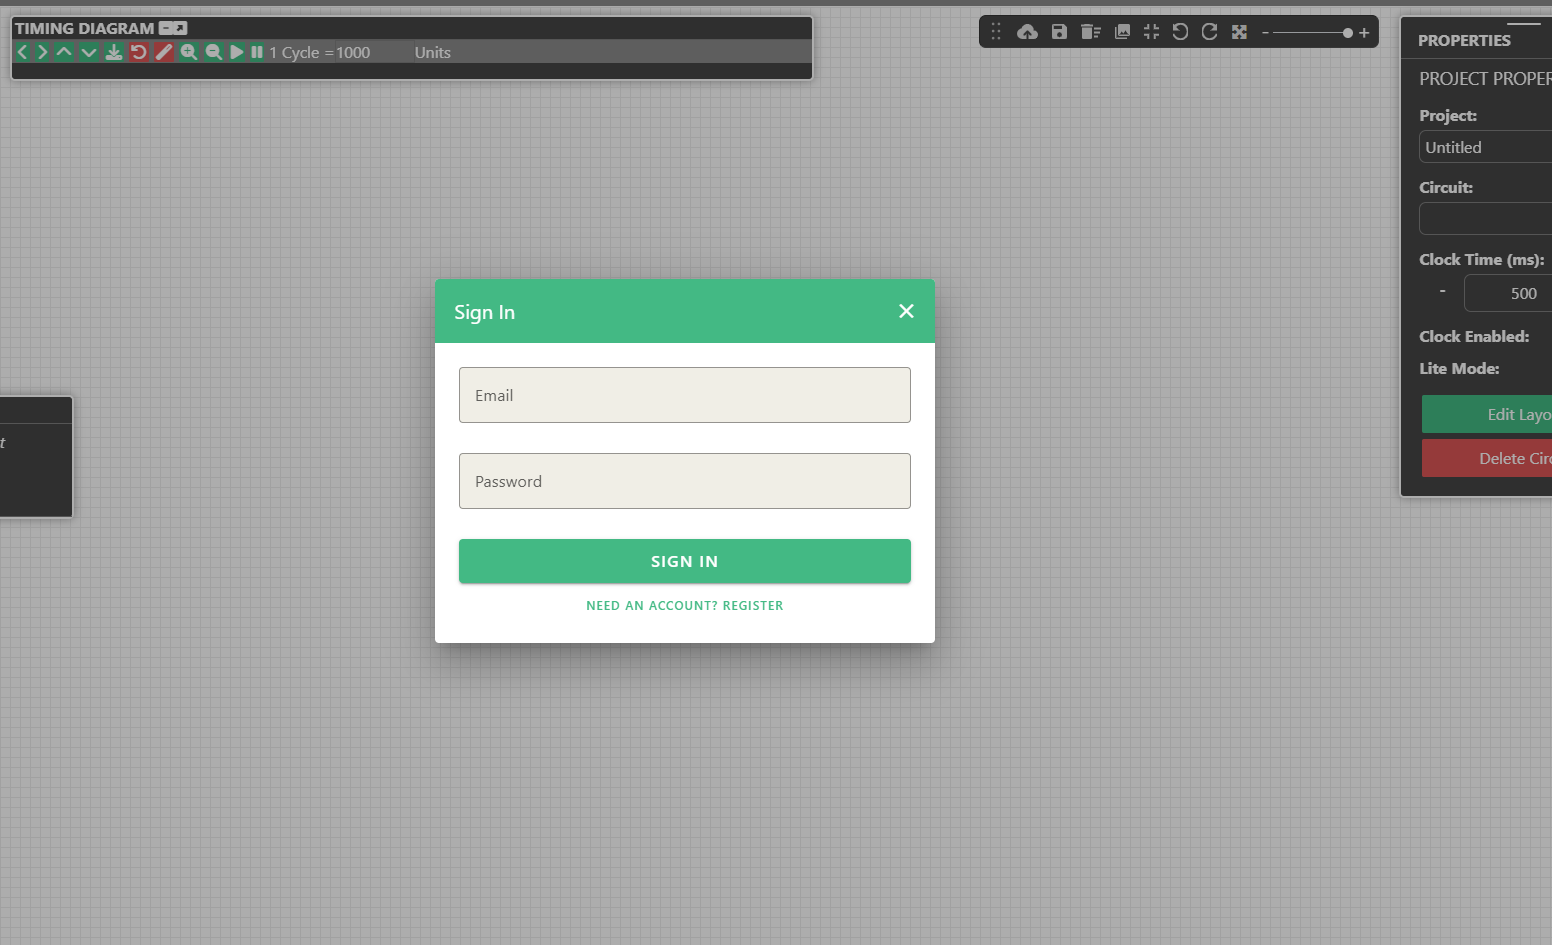
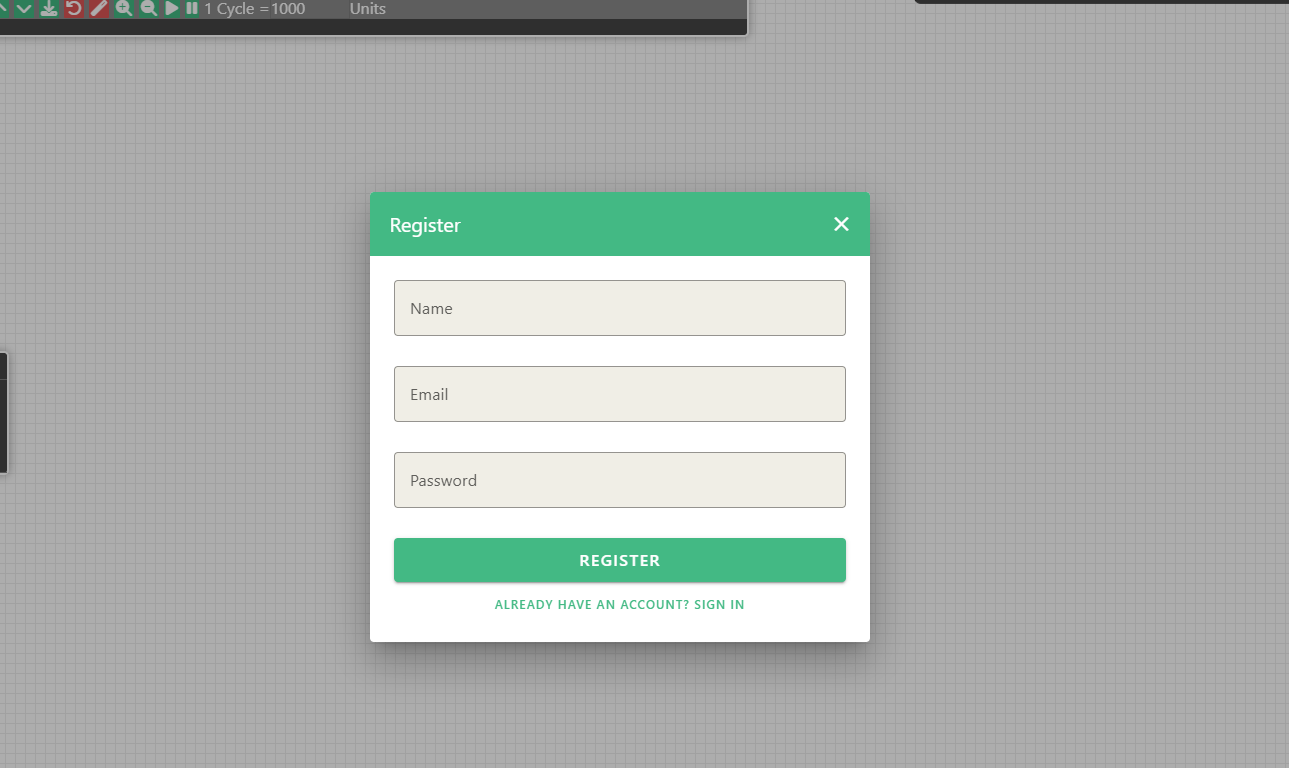
2. Authentication Model for Web and Tauri Simulator 🚪🔒
Deliverable: Added an Authentication model to Tauri Simulator. For the Tauri simulator the users now will face an Authentication model specifically made for the application. They only have to login once, their profiles will be stored up until they themselves log out from the application. ✅
Technical Tale: The reason we needed a separate Authentication model for vue simulator is because of Tauri. Earlier we were simply changing the path in the URL to direct to the Login page of Circuitverse for Authentication. This particular method fails for the Tauri simulator because:
- It is a standalone simulator with no connection to the primary codebase. 🖥️
- We want the Tauri simulator to also work when user is offline. 🌐❌
- We cannot redirect links like we do in web in Tauri. 🔗🚫
To answer those needs, it was the need of the hour to create an authentication model for the vue-simulator and so did we deliver. The authentication system in the CircuitVerse frontend is built using Vue 3 with TypeScript.
It handles both login and signup flows via API requests to the CircuitVerse backend. 🔄
- Frontend Tech: Vue 3 + TypeScript + Pinia (Auth Store) 🛠️
- API Layer: Fetch (with Tauri HTTP plugin) 🌐
- Backend Endpoints:
POST /api/v1/auth/login🔑POST /api/v1/auth/signup📝
2A. Authentication Flow 🔄
Auth Modal Handling 🪟
- A modal component (
authModal) is used to toggle between login and signup. 🔄 - Users can switch modes dynamically without leaving the page. 🔁
- A modal component (
Form Validation ✅
- Basic client-side validation rules:
- Required fields must not be empty. 🚫
- Valid email format (
/.+@.+\..+/). 📧 - Password must be at least 6 characters. 🔒
- Basic client-side validation rules:
Request Building 🛠️
- Depending on mode (
isLoginMode), the request body changes:- Login:
{ email, password }🔑 - Signup:
{ name, email, password }📝
- Login:
- Requests are sent as JSON with appropriate headers. 📤
- Depending on mode (
API Communication 🌐
- Uses the
fetchfunction (via Tauri plugin when inside desktop app). - On success, the backend responds with an auth token. 🏷️
- Uses the
State Management 🗂️
- The received token is stored in the Auth Store (
useAuthStore()). - Store handles:
- Saving token 💾
- Fetching user ID 🆔
- Sign-out / token removal 🚪
- The received token is stored in the Auth Store (
Error Handling ⚠️
- Common error responses:
401 Unauthorized→ Invalid credentials ❌404 Not Found→ User does not exist 🔍409 Conflict→ User already exists ⚔️422 Unprocessable Entity→ Invalid input 🛑
- Errors are shown to the user via a snackbar notification system. 🔔
- Common error responses:
These are some of the snaps of the Authentication model and its working video-
3. Conventional-Commit 🚀
Deliverable: Now the commits to the cv-frontend-vue require to follow conventional-commits 📝. This is to add more meaning to commits for both humans and machines 🤖.
Why and How we did it: We have added conventional-commit to the workflows, ensuring smoothness in the Automation for version tag generation 🔄. This also helps give the maintainers a good holistic view of where the simulator stands at, in turn helping them choose the minor, patch, or major version bump in the Release 🎯. (PR #656)
From here on, the commits made by everyone would need to follow the conventional-commits ✅. Some of them are as follows:
Types 🛠️
The type indicates the nature of the change:
- feat: ✨ A new feature
- fix: 🐛 A bug fix
- docs: 📚 Documentation changes
- style: 🎨 Code style/formatting changes (no logic change)
- refactor: 🔄 Code changes that neither fix a bug nor add a feature
- perf: ⚡ Performance improvements
- test: 🧪 Adding or updating tests
- chore: 🛠️ Build process, tooling, or maintenance tasks
- ci: 🤖 CI/CD related changes
4. Automating Cross-Platform Desktop Releases 🚀💻
Deliverable: An Automated Release pipeline has been added to the vue-simulator. With one click by the maintainers a Release is created and assets (Artefacts for Windows, Mac and Linux subsystems) are attached with the Latest Release under Releases heading on cv-frontend-vue primary codebase. There is also another file called CHANGELOG that is created, it holds the logs of current and all of the previous Releases. 📜
How we did it? - One of the key deliverables for the GSoC project was a reliable release pipeline for the CircuitVerse desktop app. We initially explored fully automated tools like semantic-release and release-it!, but they offered less manual control than we needed. The ideal solution needed to balance powerful automation with maintainer oversight. ⚖️
The breakthrough was using GitHub Actions’ workflow_dispatch. This allows us to trigger the release manually, providing input on the version type (major, minor, or patch), giving us the perfect blend of automation and control. This approach culminated in the final workflow that now powers our desktop releases. 🎯
4A. The Release Workflow Code 🛠️
The entire process is encapsulated in a single GitHub Actions workflow file. It’s composed of two primary jobs: build-tauri to compile the application across all platforms, and create-release to package and publish the final release. 📦
4B. How It Works 🧐
The workflow operates in two sequential jobs:
Job 1: build-tauri
This job is the workhorse, responsible for compiling the application. It uses a matrix strategy to run three parallel jobs, one for each target OS: ubuntu-latest, windows-latest, and macos-latest. This is the key to efficient cross-platform building. 🌍
Environment Setup: Each job begins by checking out the code and setting up the required toolchains, like Node.js and Rust. Crucially, it also installs OS-specific dependencies needed for compilation, such as
libwebkit2gtk-4.1-devon Ubuntu orwixtoolseton Windows. 🛠️Dependency Caching: To dramatically speed up build times on subsequent runs, the workflow caches both the Node.js (
.npm) and Rust (.cargo,target) dependency directories. This avoids re-downloading and re-compiling hundreds of packages every time. ⚡Build & Upload: The job then runs the
tauri buildcommand, which creates the native application installers. Once complete, it uses theactions/upload-artifactaction to save these installers, making them available to the next job in the workflow. 📤
Job 2: create-release
This job only runs after all three build jobs have completed successfully (needs: build-tauri). It handles the final packaging and publishing. 📦
Artifact & Code Aggregation: It begins by downloading all the build artifacts (the installers for Linux, macOS, and Windows) from the previous job. It also checks out the repository with
fetch-depth: 0to ensure it has the full git history, which is essential for the next step. 📂Automated Changelog: The
conventional-changelog-actionscans the git history since the last release tag. Based on conventional commit messages (likefeat:,fix:, etc.), it automatically generates professional, well-formatted release notes. 📝Versioning: A bash script then determines the new version number. It fetches the latest git tag (e.g.,
v1.2.3), parses it, and increments the version based on the version-bump input (patch,minor, ormajor) that was provided when the workflow was triggered. 🔢Publishing: Finally, using the GitHub CLI, the script creates a new GitHub Release. It tags the commit with the new version, sets the release title, attaches the auto-generated changelog as the release notes, and uploads all the cross-platform installers as release assets. 🚀
The Final Product (PR #636)✨
The result is a beautifully simple and powerful release process. Now, any maintainer can go to the repository’s “Actions” tab, select the “Manually Triggered Desktop Release” workflow, choose whether it’s a major, minor, or patch release, and click “Run workflow.” 🖱️
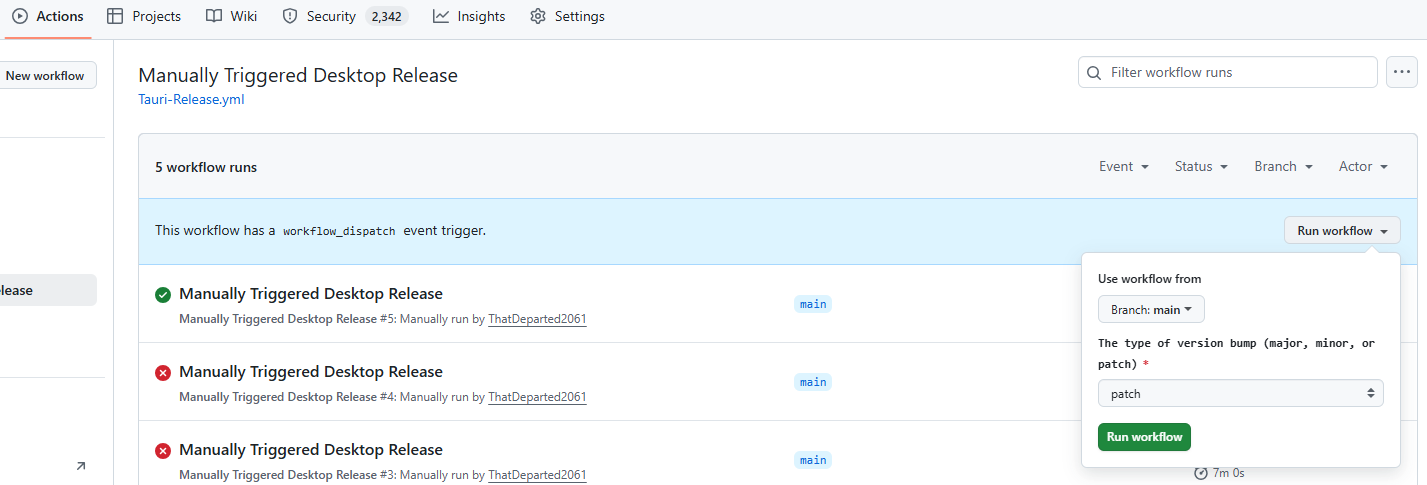
From there, everything is automated. Within minutes, a new, cross-platform release is published to GitHub, complete with installers for every OS and a professional changelog, ready for our users. This pipeline removes manual effort, eliminates human error, and ensures our releases are consistent and reliable every single time. ✅

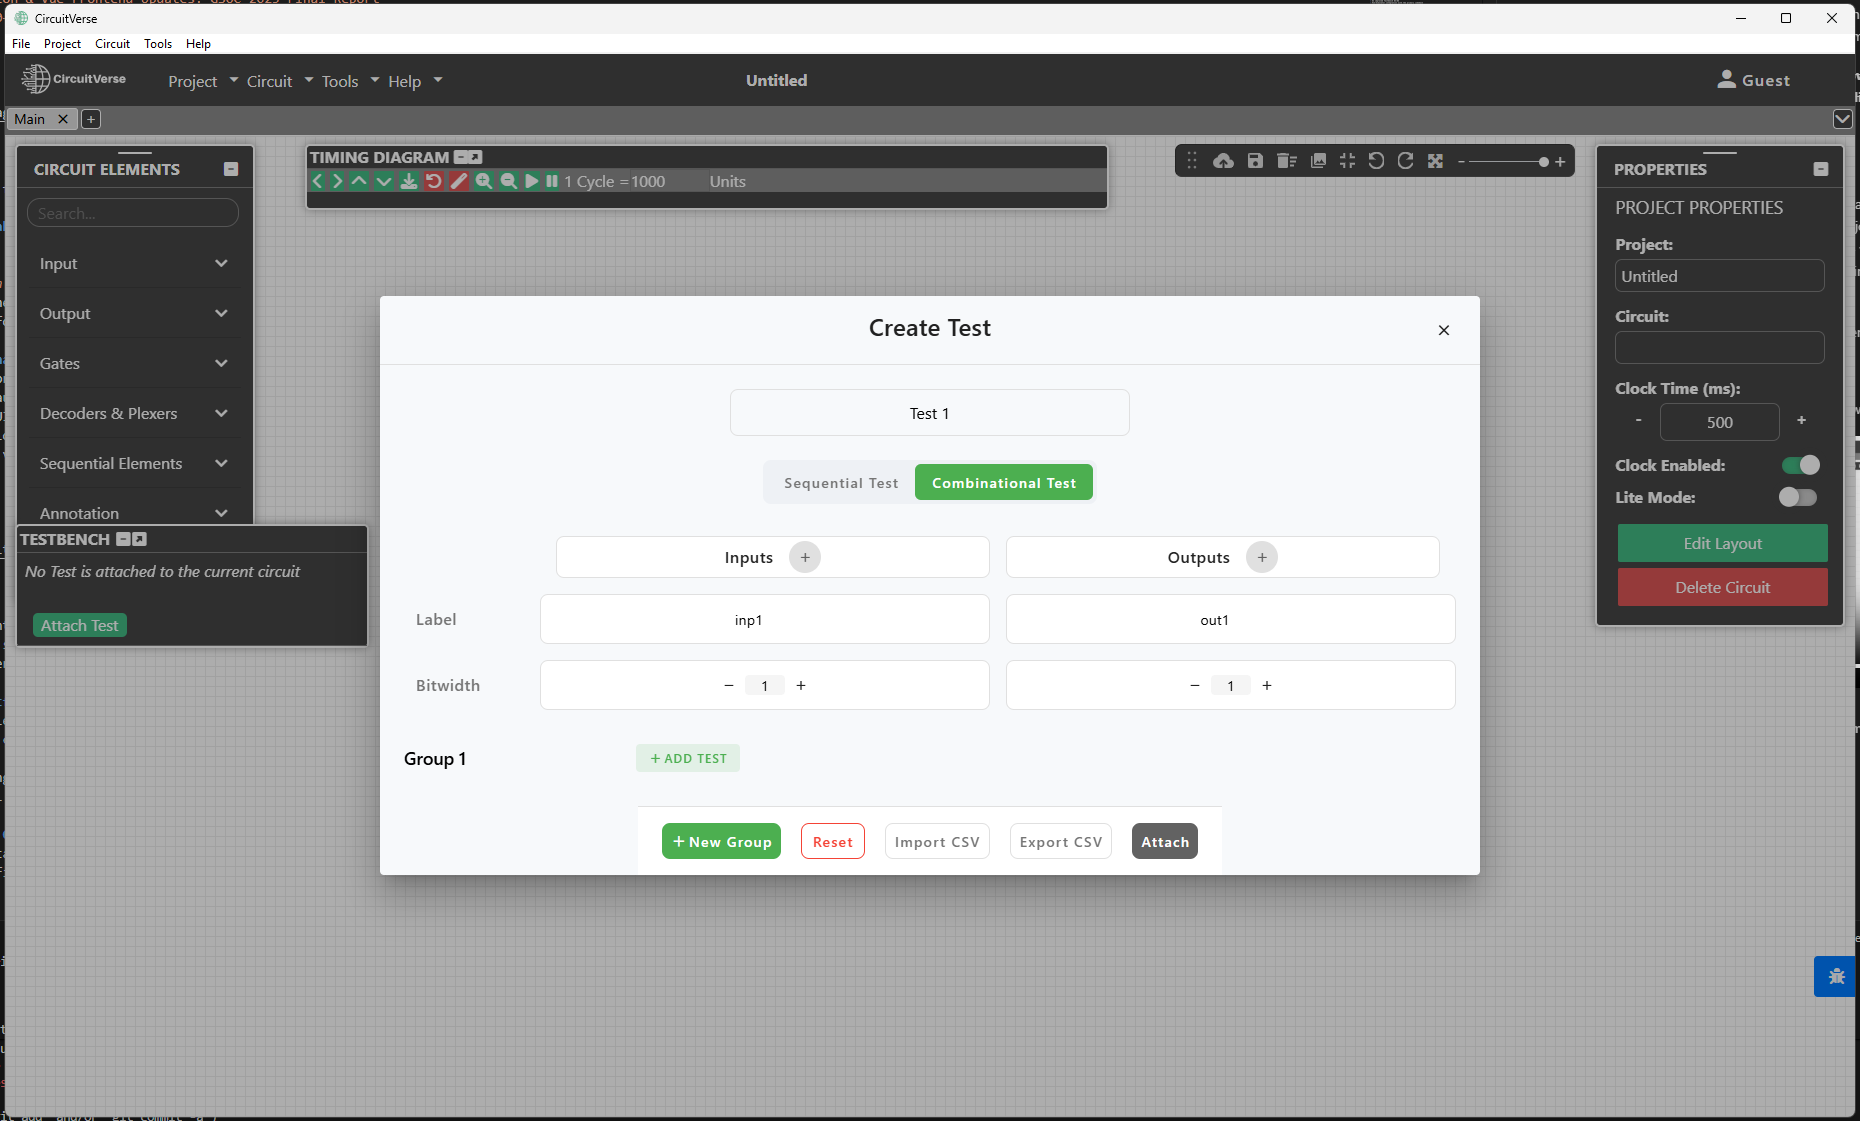
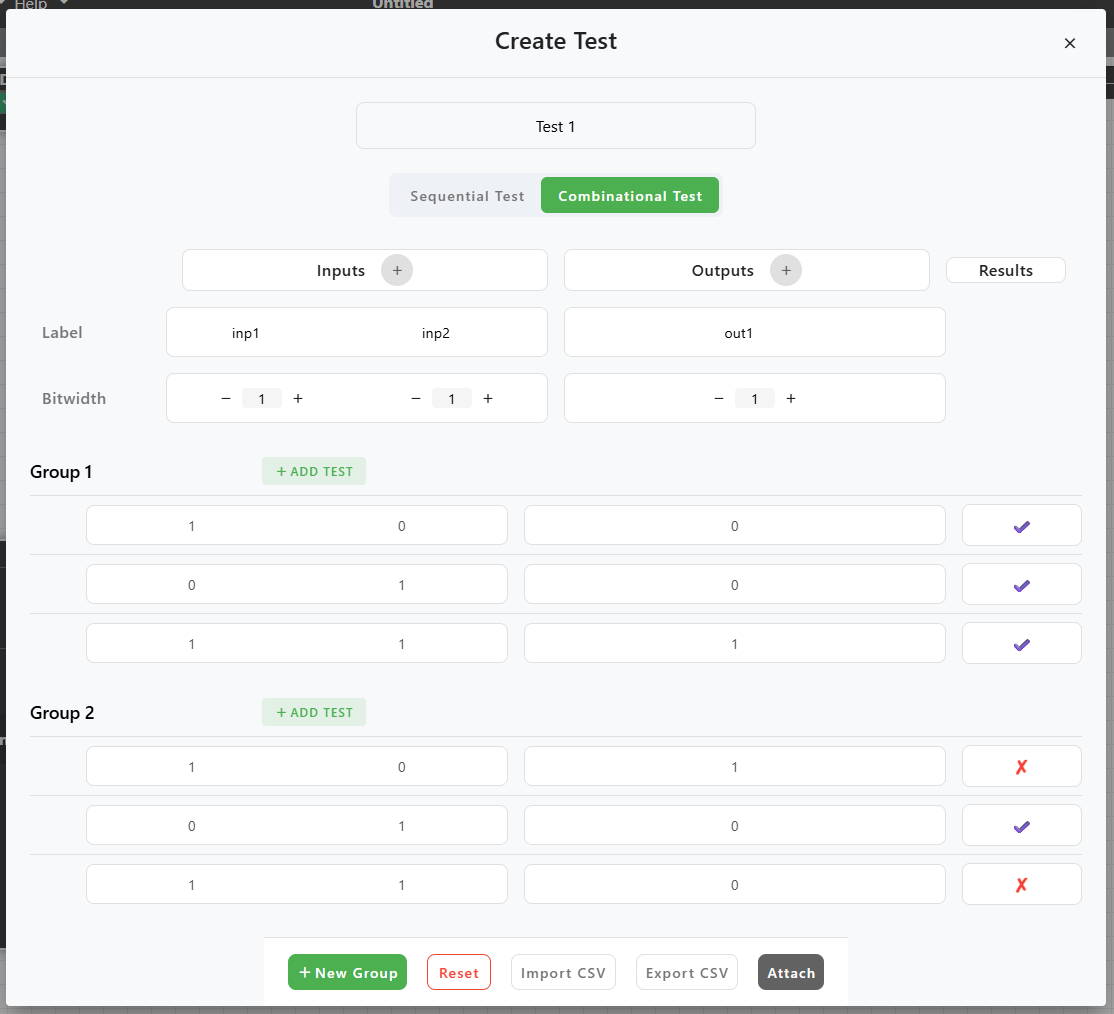
5. The Artistic new Testbench UI 🎨✨
This has been the artistic side of the project. We have had the Testbench UI for a while now, up to now it had received 2 major UI revamps during some of the previous GSOC projects. This time we went outside the current colour palette a bit. We have used the classic Circuitverse green with white, which gives it a soft and user-friendly look. 💚🤍
Here are some snapshots of the new Testbench UI 📸
Here is a video showcasing the working of the new Testbench
6. Legacy version sync to versions v0 and v1 🔄📂
Deliverable: This was a requirement for Versioning of vue-simulator. This is not a new feature but rather a major pillar of versioning. 🏗️
And what is that major Pillar? After the previous year’s GSOC project on implementing version control, we needed to sync the legacy simulator versions to the versioned folders while syncing the changes in the src folder to v0 and v1 too. This was carried out in 3 steps. 🛠️
Step 1: This step was brute-force copying all of the files from the src folder to the versioned directories v0 and v1. 📋
Step 2: Then we compared all of the changes that existed in src and not in v0 and v1. We came across many small features that were missing for src which needed to be re-written, for eg: the version mismatch dialogue for the vue simulator in openOffline.vue. (PR #599) 🛠️
Step 3: This was the part where we tested the result of the change. Since the change built up a massive PR, this step took time and also proved beneficial. We came across a few shortcomings, the major one being the preview circuits for version v1 going into infinite reload. This was created due to an error that occurred during the feature sync to the v1 folder. (PR #647) 🐛🔄
- PR : Authentication Model 🔒✨
- PR : Release Pipelines 🚀📦
- PR : Testbench UI/UX 🎨🖥️
- PR : Versioning PR 🔄📂
- PR : Conventional commit workflow 📝✅
- PR : Infinite loop error 🐛🔄
- PR : Docker Failure Fix 🐳🛠️
- PR : Embed Failure Fix ❌🔧
Learning 📚✨
I learned a lot related to working of things in software. Most of all I learned how to look for solutions. I really liked the part where I sat plannig with my mentors as to how we are going to be approaching different contingencies. We implemented many ideas and had to leave behind many too. I learned a lot about GitHub Actions, Vue.js, Rust, and TypeScript a lot. Also got to try my hands on Rails and Ruby too. 🛠️
These few weeks taught me a lot about how the industry works and how work is done. I learned a lot of things outside coding and got to meet many crazy people and learn from them. 🌟
Conclusion 🎢🎯
My journey so far has been nothing but a roller-coaster. Each week I stumbled upon things I didn’t know, then learned it, bugged my mentor about it, experimented with it and then implemented it. It has truly been a developer’s dream till now. My mentors and CircuitVerse community have been very helpful and inspirational in my little journey. Looking forward to contribute and learn more. 🚀
I would especially like to thank my mentors Aryann Dwivedi and Niladri Adhikary for being amazing mentors and guiding my way out of the walls I kept head-butting into, I would also like to thank Arnab Das, Aboobacker MK, Vedant Jain and other mentors and circuitverse contributors for helping and mentoring me throught the journey. 🙏🌟